Thursday, December 30, 2010

Chicken Nuggets

I used to think that Chicken Nuggets consisted solely of those “mystery nuggets” that you get in kids’ meals (not that I don’t still occasionally enjoy a mystery nugget from time to time), but its not true… Real Chicken Nuggets do exist.   They do!  They really do!!

P.S.  The real ones taste SO much better!  And, I'm pretty positive that they're better for you.

Homemade Chicken Nuggets
Serves 3-4

2 lbs. Chicken Tenders, cubed
1 Large Egg
1 ½ Tbs. Milk (Whole Milk works best)
1 Pinch of Kosher Salt
2-1/2 Cups Sour Cream and Onion Chips, crushed (I use Baked Lays)
2 Tbs. Grated Parmesan Cheese
¼ tsp. Ranch Seasoning (I use Hidden Valley)
¼ Cup Shredded Parmesan, for topping (optional)
½ Cup Buttermilk (optional)

Soak your chicken in Buttermilk overnight, optional.

Preheat oven to 375°

In a small/medium sized bowl make your egg wash; Beat egg, milk and salt together.

Trim the chicken and cut into ½” cubes.  Add the pieces to the egg wash as you go.  Place chicken in the refrigerator as you prepare the potato chip crumb-mixture.

Start crushing the potato chips.  When you’re done crushing the chips add the grated Parmesan and ranch season, give the mixture a little stir until all is combined.

Begin covering the egg wash coated chicken with your potato chip crumb-mixture; One by one roll the chicken in the mixture, making sure that all sides are coated.  Line your nuggets on a cookie sheet.  At this point, I sprinkle the shredded Parmesan atop the nuggets.  Cook for 15-20 minutes, flipping the nuggets half way through.

They’re quick, they’re easy and they’re oh-so good.

WARNING:  These little nuggets are addicting.  Serve with Ranch or BBQ Sauce and you may not be able to stop!

Bringing Home the Bacon

I have never met a person that can devour as much bacon as my husband!  He just has an endless stomach/craving/appetite for it. 

I myself have not always been a huge fan of bacon.  I slowly started to develop my own craving for it and before I knew it, I was addicted.  Here’s what sent me over the edge:

It all started when we were getting ready to leave Mammoth one weekend after a family wedding.  Cousin Joy decided to mention this “Great bacon place” she had once heard about in Bishop, California.  So what does any normal family do (the bacon addiction runs in the Daily family) with that tid-bit of information?  We buy an ice chest from a local grocery store, fill it with ice, and make a little pit-stop on the way home- Only to fill the entire thing up with bacon.

My-oh-my, “great” does not even describe this bacon.  It is absolutely amazing!  So amazing and so addicting that we now regularly order it online.  It’s talked about so much in our families that we usually receive it as a Christmas present or Birthday gift.

Tasty Find:  Mahogany Smoked Meats

Saturday, December 11, 2010

C is for Cookie

It hasn’t felt much like Christmas in my house, and I know exactly why…  I hadn’t had a chance to bake anything.  Hello, it is a Christmas staple.  I finally got a chance to do some baking and well, let’s just say “It’s beginning to look a lot like Christmas.”

A tried and true recipe that I’ve gone to for the past couple years is Nigella Lawson: Cranberry White Chocolate Cookies They’re um, well, hmmm… Perfectly Christmas.

The original recipe is absolutely delicious, but due to personal preferences I’ve altered it just slightly.  Here’s “my” version:


Cranberry-Apricot and White Chocolate Cookies
(Makes about 36 Cookies)

1 cup All-Purpose Flour
½ tsp. Baking Powder
½ tsp. Kosher Salt
1 cup Rolled Oats (NOT Quick Cooking)
9 Tbs. Unsalted Butter
½ cup Dark Brown Sugar
½ cup Superfine Sugar
1 large Egg
½ tsp pure Vanilla Extract
½ cup Dried Cranberries
½ cup Dried Apricots
¼ cup Pecans, roughly chopped
¼ cup (heaping) White Chocolate Chips

Preheat oven to 350°

In a medium sized bowl mix flour, baking powder, salt and oats.

Fixed with the paddle attachment, cream the butter and sugars (dark brown and superfine) together.  Slowly add the egg and vanilla, mixing until just combined.

Add your flour mixture and beat until just combined.  Remove the bowl from the mixer and fold in cranberries, pecans and white chocolate chips.  Let dough cool in the refrigerator for at least 15 minutes.

Spoon tablespoon-sized dough balls with your hands and place on a lined cookie sheet.  Remember, this recipe yields almost three-dozen cookies so you may need more than one cookie sheet.
           
Bake for 12-15 minutes.  Do not immediately remove cookies from the baking sheet when done, let cool for about 5 minutes.

F is for Fun, and Festive… and Fat, which is how I’m going to start my New Year.


Tasty Tips/Finds:
  • Mix and match a variety of dried fruits.  Just be careful not to alter the balance; Keep your dried fruit close to the one cup measurement.
  • Yes, there is a difference between Granulated sugar and Superfine sugar (also referred to as Baker's sugar).  If you don't have Superfine sugar just give your Granulated sugar a couple pulses in the food processor (or Magic Bullet), and problem solved.

Thursday, December 2, 2010

Thanksgiving 2010 Recap

I know, I know… I’ve fallen a little behind with posting this week.  I blame it on the turkey!  He made me eat, and nap, and eat, and play cards, and eat, and nap… Oh, you get the idea.  It was pretty unbearable.  I’m back and ready to get in the kitchen, but first I want to recap my Thanksgiving holiday.

Our Thanksgiving was spread over two Turkey Days, I like to refer to it as “His and Hers.”  We celebrate Thanksgiving Day (Thursday) at his parents’ house, and the Saturday after we recreate the whole thing and celebrate with her (my) family.  Get it, “His and Hers?”  We get double the food, double the family time, and double the fun (Oh, and double the dishes too).  It’s great, except for the dishes part!

His Thanksgiving (Turkey Day Round 1)

I started prepping/cooking Thanksgiving dinner with McD about oh 5-ish (?) years ago.  It’s something that I really enjoy doing and it’s definitely part of that ‘special family time’ I was talking about in I LOVE ThanksgivingThe day usually starts off pretty early (somewhere between 6:00 AM and 7:00 AM) with peeling potatoes or decorating the table, and ends around 8:00 PM with leftover turkey sandwiches and a Christmas movie.  And everything in between, of course. 

This year was really no different (except Ryan and I didn’t stick around for the movie, by 8:00 PM our full bellies started demanding pajamas and we had to oblige).  McD and I started around 7:30ish with prepping the turkeys, then sat down to make the schedule/check-list for the day.  Slowly but surely, one by one things were crossed off and wah-la, the check-list was tackled.  She did most of the work!  Speaking of tackling, McD and I only wanted to wrestle each other once this year.  (Yes, I will wrestle my mother in law.  She’s one tough cookie!)  We managed to resist the urge and move forward though.  I was proud of us!  Hm, now that I think about it… What happened to those carrots?

My Favorite(s):  Corn Soufflé and Roasted Brussels Sprout

Her Thanksgiving (Turkey Day Round 2)

I get really excited about Her Thanksgiving because it’s at my house and I do just about all of the cooking.  There’s just something special about having all the family together at my house eating at my table, it’s that something that I’ve come to appreciate (again, what I was talking about in I LOVE Thanksgiving) about Thanksgiving.

The day started around 5:30ish with making the schedule/check-list for the day, then it was time to start brewing the cider (my favorite and an absolute must in order for me to function that early).  I prepped the turkeys next and then panic started to set in just a little, only a little.  I was just feeling a little overwhelmed with the check-list.  Luckily McD showed up at that point and helped peel potatoes (which I should have done the night before), and Ryan helped too.  While they were being busy little peelers (there were A LOT of potatoes) I was getting the stuffing put together (again, something I should have done the night before).  From that point on things seemed to flow from one thing to another and before I knew it everything was done.  And!  I’m very happy to say that everything on my planned menu got accomplished.

My Favorite(s):  Pear Liquor Hard Sauce and Apple Pie, together!

THANK YOU to everyone that celebrated with us, especially our families.  This holiday really holds a special place in my heart and so do all of you!

THANK YOU, THANK YOU to Ryan and McD for all of your help!

THANK YOU, THANK YOU, THANK YOU to God for blessing me with so much to be thankful for this year!

Tuesday, November 23, 2010

Crockpot Turkey

While I’m a firm believer that your Thanksgiving bird should be roasted I’ve found that crockpot turkeys are great for everyday dinners, and (my favorite) real turkey sandwiches.  Who says turkey is just for Thanksgiving?

Crockpot Turkey

1 Turkey Breast
½ cup Low Sodium Chicken Broth (or just enough to cover the bottom of the crockpot)
3 Tbs. Butter
1/2 tsp. Kosher Salt
1/4 tsp. Parsley
Pepper, to taste
1 Apple (I use Fuji)
1 small Lemon
1 Orange
1 Celery stock

Melt butter in the microwave.  Mix salt, parsley and pepper into butter.  Spread butter on turkey breast, and in between meat and skin.

Pour broth into crockpot (just enough to coat the bottom of the crockpot).

Cut apple, lemon, orange and celery into quarters.  Lay about at the bottom of the crockpot.  Place turkey atop.  Add remaining apple/lemon/orange, plus celery.  Cook on low for 6-8 hours.

Tasty Tips/Finds:
  • Add a little lemon/orange zest to your butter mixture.
  • Place the turkey breast side down into the crockpot.
  • Be sure to check your turkey around the 6 hour mark for doneness.

Here’s a little food for thought: 
 White Bread · Real Turkey · Softened Cream Cheese · Homemade Cranberry Sauce

Try it!  But first, make sure you have enough for seconds.  Excuse me while I drool.

Friday, November 19, 2010

Pumpkin Muffins

Pumpkin, pumpkin, pumpkin.

Muffins, muffins, muffins.

Yum, Yum, Yum.

Making pumpkin puree from scratch really isn’t that hard.  In fact, it’s rather easy.  I was making pumpkin puree in preparation for Pumpkin Pie when I realized that I made just a wee bit too much.  Sure I could freeze it and use it another time, but nope, I decided to make Pumpkin Muffins instead.


Pumpkin Muffins

Step One:  Pumpkin Puree

1 Sweet Pumpkin (about 1-2 Lbs.)

Preheat oven to 425 degrees.

Remove the stem.  Slice the pumpkin in half, top to bottom.  Discard the seeds.

Place the pumpkin, cut side down, on a rimmed baking sheet.  Bake for 50-60 minutes.  The flesh should begin to separate itself from the skin when done.  Carefully scrape the darkened flesh and discard.  Separate and scoop the remaining flesh into a medium sized bowl.

Let cool completely, or chill in the refrigerator overnight.

Reduce oven to 350 degrees (for muffins).

Pumpkin Muffins (Makes 12)

1 ¾ cup Pumpkin Puree (see above recipe)
1/3 cup Vegetable Oil
1 tsp. plus a pinch Pumpkin-Pie Spice
1 ¼ cup Granulated Sugar
½ tsp. Kosher Salt
2 Large Eggs
1 ½ cups All-Purpose Flour
1 tsp. Baking Powder
½ tsp. Baking Soda
Topping:  2 Tbs. Granulated Sugar plus 1 ¼ tsp. Cinnamon, mixed

Preheat oven to 350 degrees.  Line muffin pan with liners.

With the paddle attachment mix pumpkin, oil, pumpkin-pie spice, sugar, and salt (scraping the sides as you go).  Add eggs, mixing until just combined.

Sift flour, baking powder and baking soda together in a small bowl.  Gently stir in flour mixture (almost as if you’re folding it) into the puree mixture.  I suggest doing this manually, not with the mixer.  And again, ONLY until just combined. 

Divide the batter evenly among each muffin cup (I use an ice-cream scooper; Two heaping scoops usually does the trick).  Sprinkle topping over each filled cup.  Bake for 22-25 minutes.

Gobble, gobble, gobble.

Wednesday, November 17, 2010

Pie Crust 101

Over the past couple weeks I have tried countless ‘Perfect Pie Crust’ recipes, but there was nothing perfect about them.  In fact, I started to think that pie crust was going to be my new kitchen-nemesis.

Thanks to a little research and another cooking class at Williams-Sonoma, I think I’ve solved my problem.  Here are some of the techniques that have helped me overcome this almost-nemesis... and just in time for Thanksgiving.  Gobble, Gobble!

1.      Chill ALL of your ingredients.
Butter should be used right out of the fridge.
Water (or any other liquid you’re using) should be ice cold.
Measure and refrigerate dry ingredients before you start.

2.      Freeze your dough before rolling.  Most recipes will say that it is okay to chill, but I’ve found that it makes a world of difference when you’re rolling out dough that has been frozen.  It's so much easier… less messy… and makes for a prettier finished product!

3.      Sandwich your dough in between two sheets of parchment paper.  The dough will not stick to the parchment paper… Less flour mess, no heavy flour taste, easy clean up, and easy transport.

4.      When you pull the dough out of the freezer give it a few minutes to defrost (about 5-7 minutes will do).  Then take your rolling pin and give the disc a couple of whacks, making sure to rotate the point of contact so that your disc stays round.

5.      When you’re ready to line your pie dish just remove the top layer of parchment paper, align the dough with your dish, flip, and peel off the parchment paper.  LIFT then TUCK into the corners.

6.      Refrigerate the lined dish for about 15-30 minutes before baking, or filling.


Here are a couple recipes worth trying:

Friday, November 12, 2010

Prepping for Turkey Day

 “My name is A. Daily and I am OCD-Crazy.”  Wow, it feels good to say that out loud.

I couldn’t always admit this (oh yeah, I’m stubborn too), but some of the things that I just have to do are crazy.  It’s become what I like to call “OCD-Crazy.”  I can’t remember if this was a self-diagnosed term, or if it was one given to me.  Either way, its grown on me and it sums up some of my quarks in the kitchen.  Like…

My dishes are stacked nicely and aligned in the cabinets, each in a specific spot.

Each shelf in my pantry is designated a specific grouping, and rows are aligned.

All the labels in the refrigerator are facing outwards, and rows are aligned.

And, I even like to load my dishwasher a specific way.

Some of the characteristics of my OCD-Crazy make the day-to-day stuff easier, but sometimes it just becomes an internal nuisance.  I’m a little embarrassed to admit all this, but I feel it will help you better understand this post.

Now, for the real reason of this post:  Thanksgiving Prepping!

My OCD-Crazy has naturally worked its way into my preparation, but I really think it’s going to help come Turkey Day.  First, I’ve created my detailed menu and got a hard copy of each recipe.  Then I gathered all the recipes together and made a very detailed grocery list, (making sure to add the measurements of each overlapping ingredient in each recipe) categorizing each ingredient into one of the following categories:  Basics, Dairy, Produce, and Non-Perishables.  Here’s why I chose these four categories.

Basics (Staples, Spices, Nuts):  These are generally items that you think you have, but you should double-check that (a) you do in fact have whatever it is, and (b) you have enough for all of your recipes.

Dairy:  These are ingredients that you probably use a little more regularly, but should double-check dates and make sure you have enough (especially butter).

Produce:  You want produce to be as fresh as possible.  Making it its own category makes the daunting task going to the grocery store the week of a little easier.

Non-Perishables:  You can stock up on these ingredients early.  Like now!

This may seem a little overboard, but its no fun when you’re half way through a recipe and have to send Hubby to the grocery store because you didn’t account for something.  And, it's really no fun when you've completely forgotten an ingredient all together. 

I take things to a whole new level once the grocery shopping is done, but I’ll save that for another post.

Wednesday, November 10, 2010

Ingredient: Apples!

I love that we're FINALLY getting some crisp Fall weather in Southern California.  It's weather like this that makes me love Fall.  I now feel more motivated than ever to fill the house with all the sweet aroma of Fall baking.  Baking season I officially in full gear at my house.

I'm really feeling inspired by apples right now.  I love how apples are pretty just sitting in a fruit bowl, I love all the different colors and shades, I love how refreshing they are, and I really love how they smell when they're baking in the oven.  Oh-my-goodness do they smell delicious!


Homemade Applesauce ·  Apple Cider

Homemade Applesauce

1-2 Naval Oranges
1 Lemon
10-12 Apples (Use 1/2 Granny Smith, 1/2 Mix)
1/2 cup Light Brown Sugar
1 pinch Cinnamon, to taste
1 pinch Nutmeg, to taste
3 Tbs. Salted Butter, cubed

Preheat oven to 350.

In a large bowl, zest and juice the orange(s) and lemon.  Add remaining dry ingredients and stir.

Core, peel, and quarter apples.  Add the quartered apples to the above mixture as you go.

Transfer the mixed ingredients to a Dutch oven.  Sprinkle cubed butter atop.

Bake for 1.5-2 hours.  Mix baked apples with a wire whisk.

Apple Cider (My Favorite)

1 (1 Gal) bottle of Apple Cider
2 cups Apple Juice
1 cup Cranberry Juice
1/2 cup Orange Juice
1 dash Cinnamon
1 dash Nutmeg
1 Orange, sliced
1 Cinnamon Stick

Turn your Crockpot on high.  Pour in all liquid ingredients, then stir in the cinnamon and nutmeg. Top it off with 3-4 orange slices and a cinnamon stick.

Let brew on high for 2 hours, then turn to low until ready to serve.

Go put on your Ugg boots and enjoy a movie with Hubby.  

My Tips/Tasty Finds:
  • Don't discriminate, use a little of variety.  When baking anything with Apples I like to take advantage of the wide variety available-All the flavors, and textures, and colors blend together so nicely.
  • Apple Cider!  Start with a good quality Apple Cider.  I like using an organic cider.

Saturday, November 6, 2010

Cheesy Green Chili Artichoke Dip

I took a little break for Thanksgiving planning (but only a little one)...

... to have Game Night with two of our favorite couples, Taylor & Russell and Stephanie and Danny.  We love having them over because they're a lot of fun, I think they might love cards just as much as we do (we're kind of card-game fanatics), and it gives me an excuse to make a little something extra special for the night- Cheesy Green Chili Artichoke Dip.

The last time that we had them over I made this dip and it seemed to be a hitt so I decided to make it again, but with a little extra something-something for dipping.


Cheesy Green Chili Artichoke Dip
and a Little Something-Something (Homemade Tortilla Scoops)

Cheesy Green Chili Artichoke Dip

1 (8 Oz) block of Cream Cheese, softened
3/4 cup Mayonnaise
1 (14 Oz) jar of Artichoke Hearts, drained and chopped
1 (4.25 Oz) can of Green Ortega Chilis
1/2 cup shredded Parmesan
1 Tbs. grated Parmesan
1 cup shredded Mozzarella
3 dashes of Hot Sauce (such a Tapatio)
1/4 cup shaved Parmasan, for topping

Preheat the oven to 350.

In a medium bowl, beat the cream and mayonnaise with a hand mixer until smooth.

In a small bowl, mix all cheeses together (except the shaved Parmesan).

Add cheese and remaining ingredients to the medium bowl and stir until combined.

Transfer into a shallow oven safe serving dish.  Top it off with the shaved Parmesan.  Bake for 30 minutes in the preheated oven.  Then bake 10 minutes on broil.  Enjoy (and make sure you have a clean pair of stretchy pants readily available)!

For the extra something-something I decided to make...

Tortilla Scoops

1 (10 piece) bag of X-Large Flour Tortillas
1/4 cup Olive Oil
1 pinch Kosher Salt

Preheat the oven to 375.

In a small bowl, mix the olive oil and salt together.  Set aside.

With a medium-sized rimmed cup cut small circles from the tortillas.*

Lightly brush each small tortilla, front and back, with the olive oil/salt mixture.

Using a mini-muffin tin, press each small tortilla down.  Bake for 10 minutes.

*I do this because I am OCD-crazy and my circle need to be perfect.  I'm sure an imperfect circle will work just fine- The OCD-crazy in me just HAS to use the cup!

These are great because they really let you dig in.  Trust me, you will want to dig in.

Y-U-M-M-Y

Wednesday, November 3, 2010

To Brine or Not To Brine?

Have I mentioned that I <3 Thanksgiving?
Have I mentioned that I'm hosting a Thanksgiving dinner?
Have I mentioned that I've already started planning my menu?
And, have I mentioned that I'm still new at this?


Being that the turkey should be the Pièce de Résistance on the dinner table I want to make sure I get it just perfect. And, since this will be my first time cooking a whole turkey (If you don't count dragging my mother in law out of bed first thing in the morning to come clean and prep my turkey, which is what I did last year- Thanks McD!),* I wanted to get some feedback.

That being said, I know that I want to serve a traditional roasted turkey, but I've gotten mixed opinions on whether To Brine or Not To Brine?  It seems as though people are either enthusiastic and committed to the technique, or think its a-whole-lot of mess for a similar end result.  So all you veteran family-cooks and turkey lovers, what are your thoughts?


*In my defense, I was VERY new to cooking and all the "giblets" and "cavity" and "both ends" and "getting to know your bird" talk really grossed me out.  I just wasn't there yet, but I feel confident this year.  I can do it!

Monday, November 1, 2010

I LOVE Thanksgiving

Thanksgiving is my absolute FAVORITE holiday.  It wasn't always, but over the years I have really grown to appreciate it.  I love, love, love that it's an entire day devoted to delicious food, special family time, and counting your blessings.  It's everything that a holiday should be and then some.

That's not to say there isn't any hustle and bustle because of course there is.  Oh sure, there's menu planning, recipe testing, grocery shopping, cooking/baking, decorating and getting the house extra clean, but that's all part of the fun.

So, since we are officially in Thanksgiving season, and because I am already looking forward to it, I think I'll get started with my menu planning today.  Here's what I have in mind:

Starters
Corn-Man Veggie Platter (This is a Daily-family tradition that has been passed down to me)

Dinner
Turkey
Mashed Potatoes / Gravy
Sweet Potato Casserole
Stuffing
Corn Souffle
Balsamic Berry Salad
Cranberry Sauce
Rolls

Dessert
Apple Pie
Pumpkin Spiced Cupcakes
Pear-Apple-Cranberry Crisp

At least that's the plan.  Now, please keep in mind that I am still new at this so feel free to let me know if I've left off a classic must-have.

Sunday, October 31, 2010

Spiders in My Cookie Jar

Okay, okay so they're not real spiders...


H a P P y    H a L L o W e E n !

Home-Brewed Spider Oreos
     

Saturday, October 30, 2010

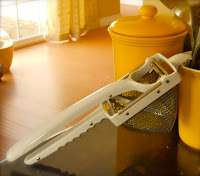
My Friend the Potato Ricer

Allow me to introduce you to a friend of mine, Ms. Potato Ricer.  Since joining my kitchen about a month ago she has helped me conquer Mashed Potatoes.  I cannot explain it, but Mashed Potatoes used to be my kitchen-nemesis and I could never get them right.  The Potato Ricer creates the most perfect texture and I would never attempt to make Mashed Potatoes without her now.  She is an absolute must-have for Thanksgiving!


EASY TO USE:  Cook Potatoes -> Rice Potatoes -> Add Ingredients and Mix -> Enjoy!


My Tips/Tasty Finds:
  • Using a mixture of potatoes (Yukon, Red, Russet, etc.) gives great flavor.
  • You do not have to peel your potatoes when using the Potato Ricer.
  • Make sure you generously salt your potato-water BEFORE you start, and do not use too much water (just enough to cover the top of your potatoes).
·  
·